
IDG
Simple Sharing with the desktop version of Excel
In March 2016, the desktop version of Excel was given a feature called Simple Sharing, and some industry watchers believed that live collaboration for Excel was finally here. Alas, it's not. Instead, it's only a way for people to more easily use the sharing features that have existed in one form or another since Excel 2007. Sharing in Excel has always been kludgy, and the Simple Sharing feature in Excel 2016 doesn't make things dramatically easier. Still, if you often work with others on spreadsheets, you may want to try it out.
First you need to prepare a workbook for sharing. (Note that you can't share workbooks with Excel tables in them, and there are other limitations as to the formatting and features that can be performed in a shared workbook.)
In the workbook you'd like to share with others, click Review on the Ribbon, then click Share Workbook, and in the Editing tab of the screen that appears, check the box next to "Allow changes by more than one user at the same time. This also allows workbook merging." Then on the Advanced tab on the screen, select how you want to track changes and handle edits made by others -- for example, for how long to keep the history of changes in the document. When you're done, click OK.
You can now share the workbook with others, see the changes everyone makes after they've made them, and decide which to keep and which to discard. None of this is new -- it's all been available in previous versions of Excel. But with Simple Sharing, it's easier to share the file itself, because you store it in a cloud location everyone can access, and then share it with others.
To use Simple Sharing, first save the file to a OneDrive, OneDrive for Business, or SharePoint account. (Those are the only services that work with Simple Sharing.) To do so, click File > Save As and select the appropriate OneDrive or SharePoint account.
After you do that, click the Share icon in the upper-right corner of the workbook. The Share pane appears on the right. The Share pane is likely the reason that some people mistakenly believe Excel offers real-time collaboration, because it's the same Share pane that Word, PowerPoint and OneNote use for collaborating. The difference is that in the case of Excel, you'll only be able to use the pane to let someone else access the document -- it won't let you perform real-time collaboration.
At the top of the Share pane, type the email addresses of people you want to share the document with in the "Invite people" box, or click the notebook icon to search your contact list for people to invite. Once people's addresses are in the box, a drop-down menu appears that lets you choose whether to allow your collaborators to edit the document, or only view it. Underneath the drop-down, you can also type in a message that gets sent to the people with whom you're sharing the document. When you're done, click the Share button.
Note that you can assign different edit/view privileges to different people, but only if you send different emails to each. In each individual email you send out, you can choose only edit or view, and that applies to everyone in the email. So to assign different privileges to different people, send them individual emails instead of bunching them all in a single email.
 IDG
IDG The Share pane lets you share spreadsheets with others. Click image to enlarge.
An email with a link to the file is sent to the people you've designated. Note that this is the full extent of what Simple Sharing does -- after that email is sent, you use the same sharing features that already existed in Excel before the 2016 version, as I'll outline below.
People with whom you're sharing the file need to click on the icon of the file in their email in order to open it. They can look through the worksheet, but if they want to make changes to it, they'll have to save a copy of it in the same folder where they opened it. The original itself will be read-only for them.
Your collaborators make whatever changes they want in their copy of the worksheet, and save it. You then open your original worksheet, and you can merge the changes in their copy of the worksheet with your original worksheet. Before you can do that, though, you need to take these steps:
1. Click the Customize Quick Access Toolbar icon. It's the fourth icon from the left (a down arrow with a horizontal line above it) on the Quick Access Toolbar, which is in the upper-left corner of the screen. On the screen that appears, click More Commands.
2. On the screen that appears, go to the "Choose Commands From" drop-down box, and select "All Commands."
3. Scroll through the list, select Compare and Merge Workbooks, and click the Add button in the middle of the screen.
4. Click the OK button at the bottom of the screen.
The Compare and Merge Workbooks icon now appears on the Quick Access toolbar as a circle.
In the original worksheet you shared, click the Compare and Merge Workbooks icon. When the "Select Files to Merge into Current Workbook" dialog box appears, click the copy of the workbook that the person has made. Then click OK. All the changes made by the other person to the workbook will appear in the original workbook, identified by who made them. You can then decide whether to keep the changes.
For more information about using and merging shared workbooks, see Microsoft's "Use a shared workbook to collaborate in Excel 2016 for Windows." Just a reminder: This shared workbook feature is not new to Excel 2016. Only the way to share the workbook itself has changed, by using the Share pane.
I find the sharing features in Excel's desktop version to be extremely kludgy, even using Simple Sharing. It's encouraging that Microsoft has a real-time collaboration beta in the works; I am eagerly anticipating the day it becomes stable and rolls out to Excel 2016 users.
Four new features to check out
Spreadsheet pros will be pleased with four new features built into Excel 2016 -- Quick Analysis, Forecast Sheet, Get & Transform and 3D Maps.
Quick Analysis
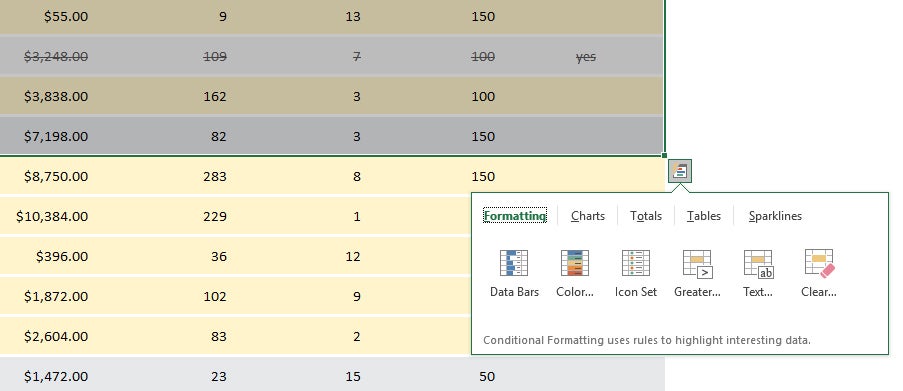
If you're looking to analyze data in a spreadsheet, the new Quick Analysis tool will help. Highlight the cells you want to analyze, then move your cursor to the lower right-hand corner of what you've highlighted. A small icon of a spreadsheet with a lightning bolt on it appears. Click it and you'll get a variety of tools for performing instant analysis of your data. For example, you can use the tool to highlight the cells with a value greater than a specific number, get the numerical average for the selected cells, or create a chart on the fly.
 IDG
IDG The Quick Analysis tool gives you a variety of tools for analyzing your data instantly. Click image to enlarge.
Forecast Sheet
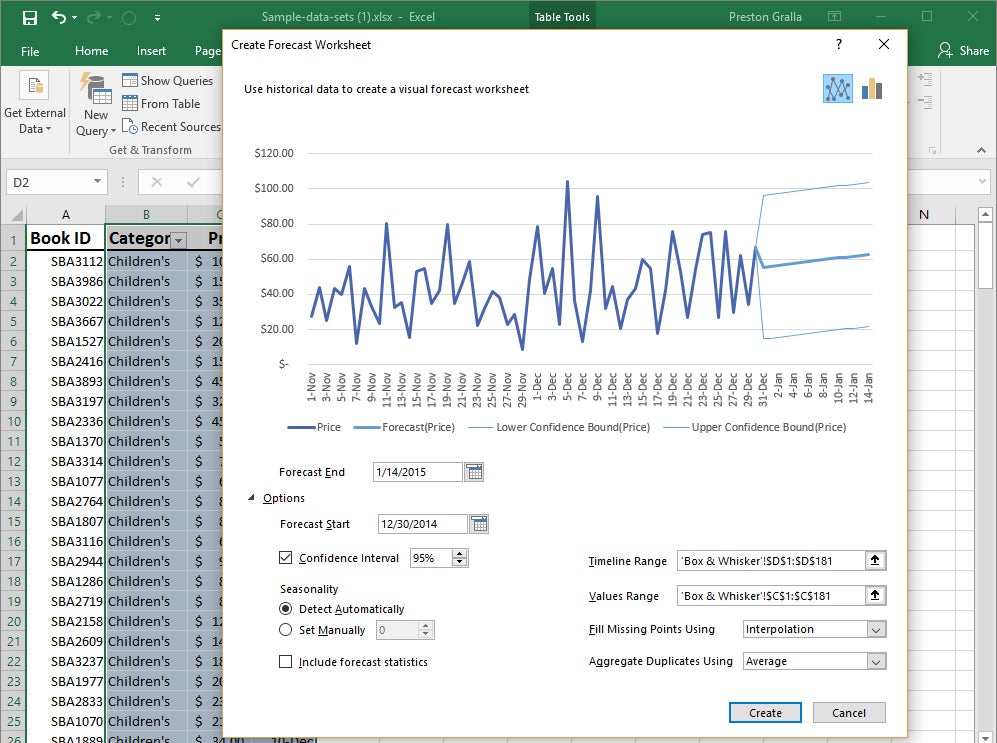
Also new is that you can generate forecasts built on historical data, using the Forecast Sheet function. If, for example, you have a worksheet showing past book sales by date, Forecast Sheet can predict future sales based on past ones.
To use the feature, you must be working in a worksheet that has time-based historical data. Put your cursor in one of the data cells, go to the Data tab on the Ribbon and select Forecast Sheet from the Forecast group toward the right. On the screen that appears, you can select various options such as whether to create a line or bar chart and what date the forecast should end. Click the Create button, and a new worksheet will appear showing your historical and predicted data and the forecast chart. (Your original worksheet will be unchanged.)
 IDG
IDG The Forecast Sheet feature can predict future results based on historical data. Click image to enlarge.
Get & Transform
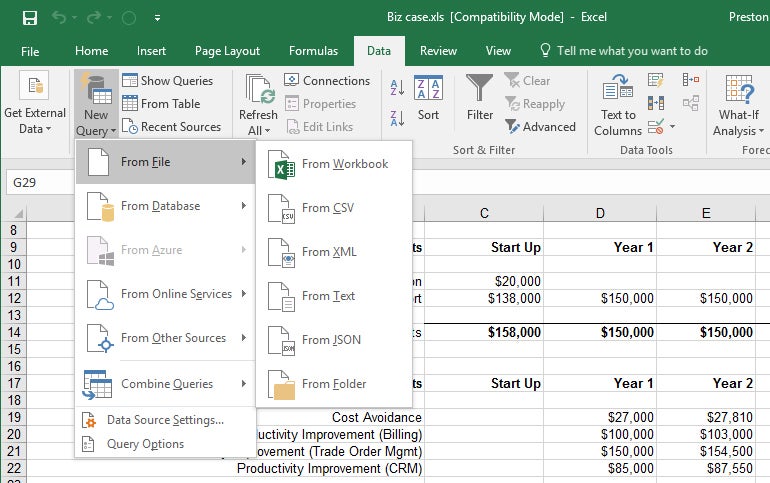
This feature is not entirely new to Excel. Formerly known as Power Query, it was made available as a free add-in to Excel 2013 and worked only with the PowerPivot features in Excel Professional Plus. Microsoft's Power BI business intelligence software offers similar functionality.
Now called Get & Transform, it's a business intelligence tool that lets you pull in, combine and shape data from wide variety of local and cloud sources. These include Excel workbooks, CSV files, SQL Server and other databases, Azure, Active Directory and many others. You can also use data from public sources including Wikipedia.
 IDG
IDG Get & Transform lets you pull in and shape data from a wide variety of sources. Click image to enlarge.
You'll find the Get & Transform tools together in a group on the Data tab in the Ribbon. For more about using these tools, see Microsoft's "Getting Started with Get & Transform in Excel 2016."
3D Maps
Before Excel 2016, Power Map was a popular free 3D geospatial visualization add-in for Excel. Now it's free, built into Excel 2016, and has been renamed 3D Maps. With it, you can plot geographic and other information on a 3D globe or map. You'll need to first have data suitable for mapping, and then prepare that data for 3D Maps.
Those steps are beyond the scope of this article, but here's advice from Microsoft about how to get and prepare data for 3D Maps. Once you have properly prepared data, open the spreadsheet and select Insert > 3D Map > Open 3D Maps. Then click Enable from the box that appears. That turns on the 3D Maps feature. For details on how to work with your data and customize your map, head to the Microsoft tutorial "Get started with 3D Maps."
If you don't have data for mapping but just want to see firsthand what a 3D map is like, you can download sample data created by Microsoft. The screenshot shown here is from Microsoft's Dallas Utilities Seasonal Electricity Consumption Simulation demo. When you've downloaded the workbook, open it up, select Insert > 3D Map > Open 3D Maps and click the map to launch it.
 IDG
IDG With 3D Maps you can plot geospacial data in an interactive 3D map. Click image to enlarge.
Handy keyboard shortcuts
If you're a fan of keyboard shortcuts, good news: Excel supports plenty of them. The table below highlights the most useful ones, and more are listed on Microsoft's Office site.
And if you really want to go whole-hog with keyboard shortcuts, download our Excel 2016 Ribbon quick reference guide, which explores the most useful commands on each Ribbon tab and provides keyboard shortcuts for each.
Useful Excel 2016 keyboard shortcuts
Ready to delve deeper into Excel? See our "11 Excel tips for power users."


