Who needs Gmail? 5 built-in Windows 10 apps that do the job (with video)
- 21 February, 2017 22:00
The touch-friendly apps built into Windows 8 and Windows 10 (originally called Metro apps and now just called Windows apps) were, for a long time, roundly denounced by many reviewers as being underpowered -- and justifiably so. The first release of Mail in Windows 8, for example, didn't have threaded messaging, and the first release of Calendar made it confusing to do something as simple as changing the view to a day, week or month.
But over time, something surprising happened. After several updates -- and the merging of the touch-friendly and keyboard-based interfaces in Windows 10 -- some of Microsoft's built-in apps have become well worth using. If you tried and abandoned them in the past, and haven't bothered to check back, it's time to give them another try.
Here are five solid apps that ship with Windows 10, along with tips on how to use them. As a bonus, I've listed three special-purpose apps built into Windows you might want to try as well.
If you took one look at Mail in Windows 8 and immediately turned away, no one would blame you. It was poorly designed, couldn't handle POP3 mail accounts and had poor text-handling features, among other drawbacks.
All that has changed. Mail has gotten a big rewrite that includes a better design and some worthwhile new features, such as being able to use it as a unified inbox for multiple main accounts (including POP3), and the addition of threaded messaging.
Follow threaded messages
Mail includes a very useful feature that makes it easy to follow threaded email conversations:
- Any mail that is part of a conversation has a small rightward-pointing arrow next to it. Click the arrow to see each message in the conversation.
- Then click any individual message to go to it.
Get alerts
Mail integrates nicely with Windows 10, so you can get alerts whenever any of your accounts receives new mail:
- In Mail select Settings -> Notifications.
- Select the account for which you want to receive notifications, and turn the slider to On.
- If you want to do it for all accounts, click the "Apply to all accounts" box.
From now on, you'll get alerts in the lower-right of your Windows screen when you get mail. A small icon shows the number of new messages you've received. To read them, just click the icon to launch the Action Center on the right-side of the screen. Click any mail message displayed there to read it.
Combine multiple mail accounts
While many email clients, such as Gmail, have allowed users to include multiple email accounts in a single interface, this was not something you could do in Mail -- until recently. Now you can read the mail from all your accounts using just one Mail inbox. Here's how you do it:
- Select Settings -> Manage Accounts -> Add account.
- From the screen that appears, select the kind of account you want to create. You can choose from several types, including Outlook.com, Exchange, Google, Yahoo Mail, iCloud or POP3 and IMAP accounts. (If you're going to set up a POP or IMAP account, you'll need information from your ISP, such as the name or address of your inbound and outbound mail servers.)
Once you do that, you'll see each of your separate accounts listed under the Accounts icon on the left part of the screen in Mail. Click any to read mail, manage mail, create mail, and so on.
Create a unified inbox
If you've set up Mail with multiple accounts, you can take things a step further and create a unified inbox showing all the mail you've sent and received from several accounts. It's simple to do:
- In Mail, select Settings -> Manage accounts -> Link inboxes.
- From the screen that appears, check the boxes next to the mail accounts you want to link into a single account.
- If you want to change the default name of the unified inbox (the default is "Linked inbox"), type the new name in the box underneath "Linked inbox name."
- Click Save.
You'll now see all mail from the linked accounts in a single new account under the name you chose. The new account will include received mail, sent mail and drafts.
Note that when you do this, each of the accounts you've linked together (for example Outlook.com and Gmail), won't show up separately in Mail. Instead, they will all be combined in the new account.
When you've created a unified inbox in this way, you'll get a choice of which account to use whenever you create and send an email.
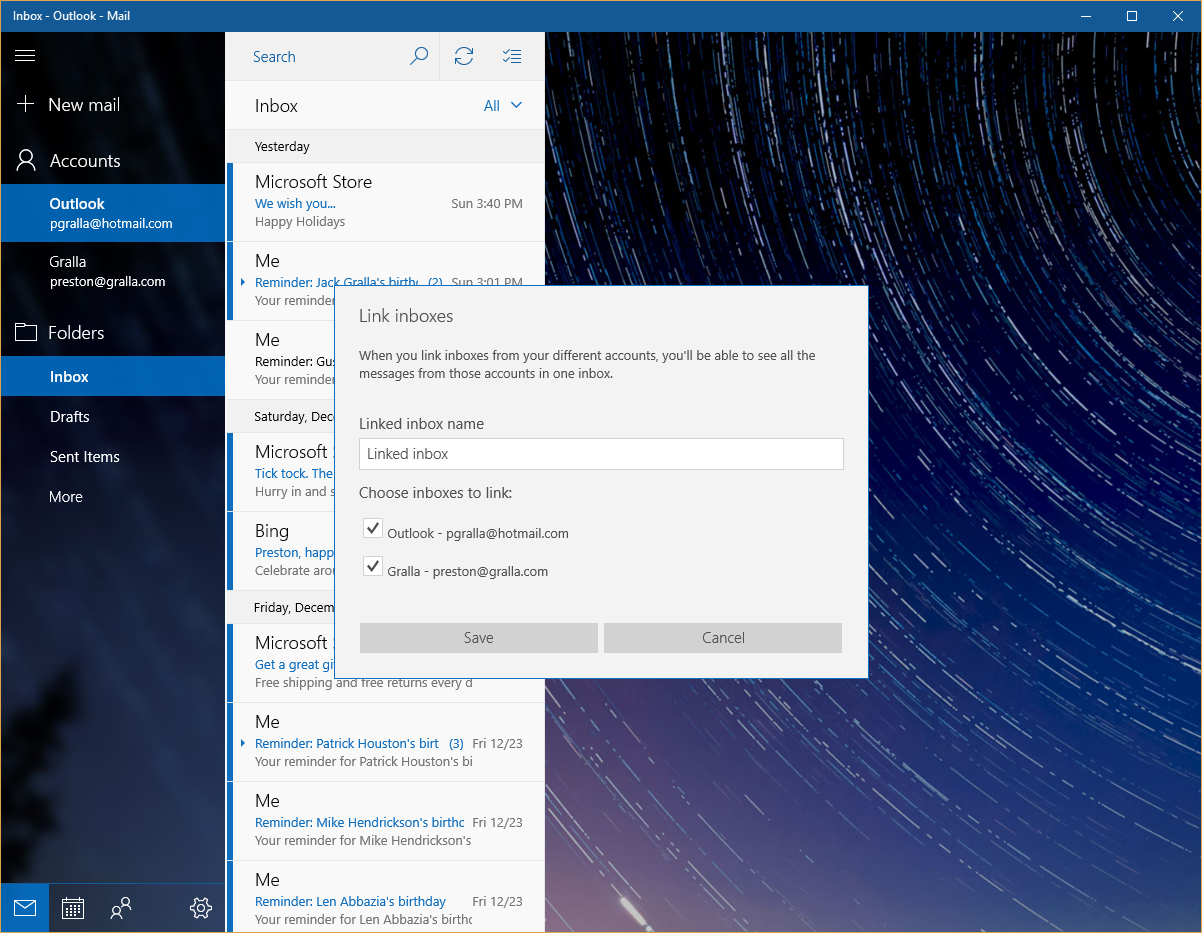 IDG
IDG Using Mail, you can now create a unified inbox.
If you want to unlink the accounts, it's easy to do:
- Right-click the unified account you created and select Account settings. You'll see a list of all the accounts you've linked.
- Click the Linked inbox icon and uncheck the boxes of each account that you no longer want linked.
- Click Save.
Each of the unlinked accounts will now appear as individual accounts again.
Calendar
If you remember Calendar from the Windows 8 days -- when doing as something as simple as changing the view to a day, week or month was a confusing task -- you owe it to yourself to check out the latest version. Like Mail, it's gotten a big overhaul. And, as with Mail, you can use it as a unified application, so that if you have multiple calendars you can see all your appointments in one place.
Using Calendar is simple and straightforward: Click the day and time you want to add an event, then fill out the form. Change your view (day, month, and so on) from the icons at the top. Here are a few tips if you want to do more than that.
Add a new calendar
You can use Calendar to view and manage multiple calendars, including Google Calendar, iCloud Calendar, Outlook.com or Exchange Calendar:
- Launch the Calendar app and select Settings -> Manage Accounts -> Add account.
- Select the kind of account (Google, Outlook, etc.) you want to add and follow the screen prompts.
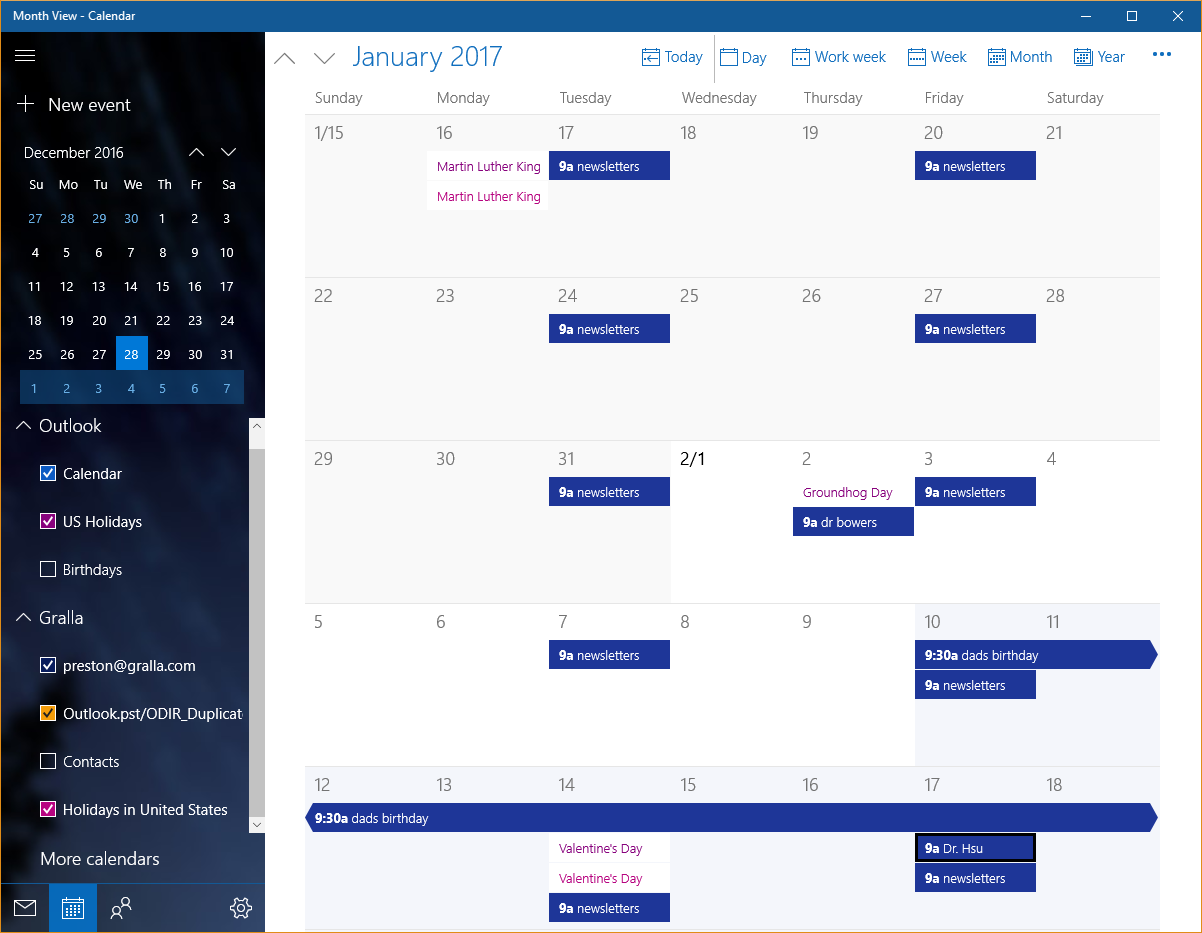 IDG
IDG Windows 10’s Calendar app lets you view all of your calendars in a single location.
Now you can see all your meetings and events from all your calendars in the Calendar app. If you want to remove a calendar, it's easy to do:
- Select Settings -> Manage Accounts.
- Click the account you want to remove.
- Click Delete account.
Filtering out events
Seeing all your events from several calendars on one unified calendar can also be confusing. For example, the Calendar app by default shows the birthdays of your contacts in all your calendars. If you've got multiple calendars, each with lots of associated contacts, your calendar could become littered with way too many birthday listings -- some of them repeated.
There's a simple fix that will clean up your calendar considerably:
- Click the so-called "hamburger button" (the three horizontal lines) at the top left of the screen.
- A new pane will appear on the left; at the bottom, you'll see all your calendars. Click the down arrow next to each calendar to see what types of information it shows -- U.S. holidays or birthdays, for example.
- Uncheck the boxes next to the information you don't want displayed.
Maps
Maps has also been improved considerably over its initial release, including the introduction of a Street View-like feature, the ability to download maps for use offline and a much-improved interface.
Maps is simple to use. You just need to type in a location and you will see a map of it; you can then use the search bar to find nearby places of interest. On the right side of the app are buttons for zooming in and out, tilting the map, changing the orientation and adding overlays for traffic and other tools.
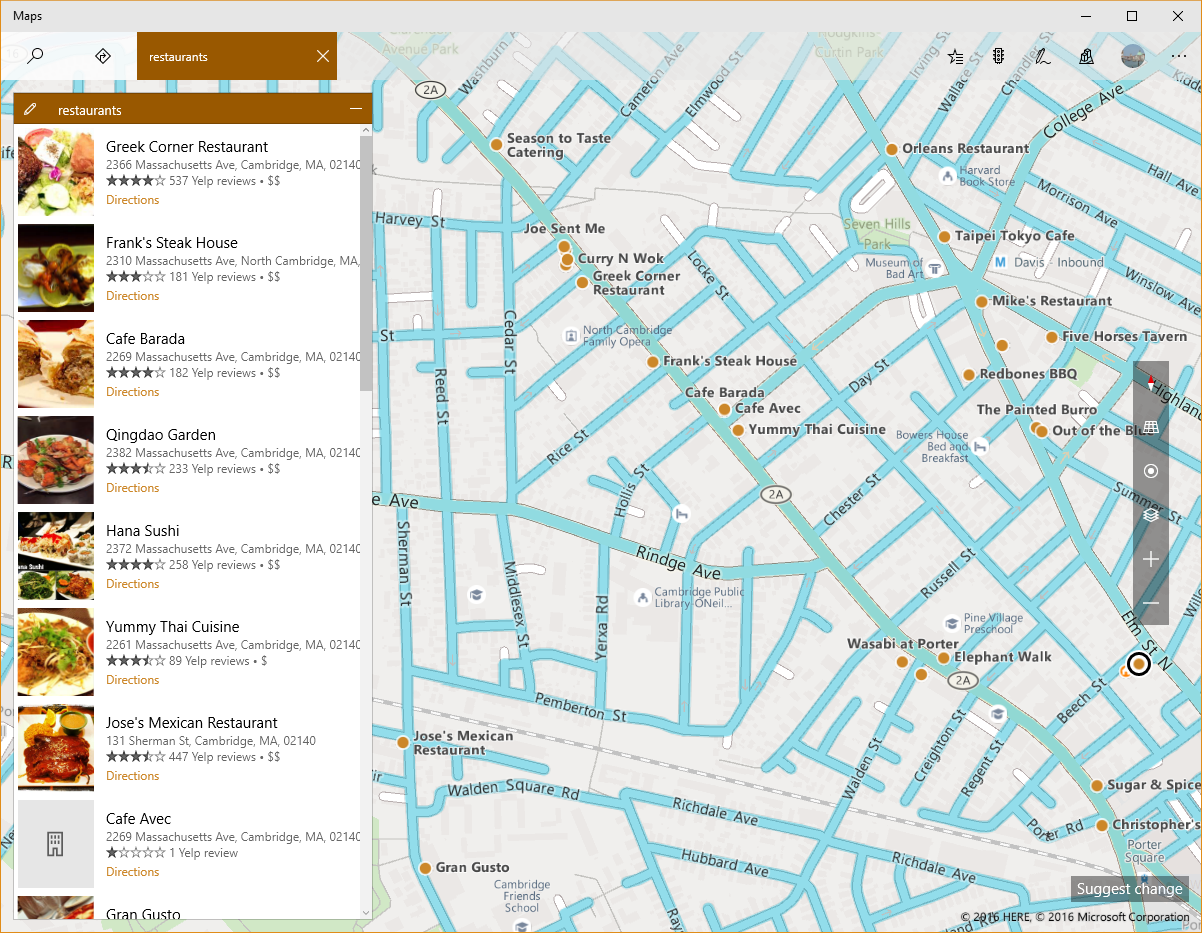 IDG
IDG The Maps app has improved so much that it now rivals Google Maps for usefulness.
If you're a Cortana user, you'll be pleased to know that Cortana integrates with Maps. Ask it, "Give me directions to Ithaca, New York," and the Map app will launch, complete with directions. Or ask Cortana to see a map of a city and Maps launches and shows it.
There's more to Maps than that, though.
Download maps for offline use
If you travel overseas and don't want to have to pay data charges for using maps, you'll find the offline maps feature a big money-saver. Just download maps to your laptop or tablet before you go, and you'll be able to use them at your destination without using data. It's also a great idea if you're in the U.S. and traveling somewhere not in reach of Wi-Fi.
Here's the best way to download offline maps:
- Quit the Maps app (you won't be able to download maps while the app is running).
- On Windows' main screen, select Settings -> System -> Offline Maps -> Download maps. You'll come to a screen that lets you browse through all the continents of the world.
- Click the continent that has the location of the map you want to download.
- From the screen that appears, click the country with the location of the map you want to download. In some instances, the entire map of the country will be downloaded (for, example, Nepal). In others, after you select a country you'll then select a region for the map you want to download -- for example, if I wanted a map of a place in Massachusetts, I would select North and Central America, then USA, then Massachusetts.
From now on, if you're in that location without a Wi-Fi connection, you'll be able to access the map offline. If you're connected to a Wi-Fi network, Windows will use the online version of the map, and automatically update for any changes in that map.
Offline maps take up storage space, so you might want to delete any maps you won't be using anymore:
- Go to Settings -> System -> Offline Maps -> Download maps. You'll find a list of all the maps you've downloaded. Click on any you want to delete.
- If you want to delete all of them, click the Delete all maps button. The map will be immediately deleted if you're not currently using the Maps app. If you are using the Maps app, it will be deleted the next time you exit the Maps app.
Use Streetside view
Maps' Streetside view is the Microsoft equivalent of Google Maps' Street View. Unfortunately, it won't feel particularly intuitive the first time you use it:
- First, turn on the feature. Click the Layers icon from the toolbar on the right of the screen.
- Under the Streetside subhead, move the slider to On.
Now, when you're using a map and want to use Streetside, click on a street you want to see, and you will be launched into that view. Look around the location by dragging with a mouse. Move around by clicking where you want to go.
You can exit Streetside by clicking the X button on the upper right of the screen.
Save favorite places and visit 3D cities
When you're in Maps, pay attention to the small icon bar at the top right of the screen -- it has some very useful features:
- The small star icon on the far left lets you save favorite places. Click it and you'll be able to save your home and work locations.
- To save any other place, click Add a place, and type in a location.
- You can then jump right to any of them by clicking the favorite places icon and clicking the location.
It's also worthwhile checking out the 3D cities, which is accessed via the icon on the far right. Select any of the listed cities or browse to others, and you'll get a high-resolution bird's-eye view that you can navigate. The only drawback is the selection of cities available, which seems weird to me -- for example, it includes London, Ontario, but not London, England, and Rennes in France, but not Paris.
Page Break
People
If you use the Mail app, you'll want to use People as well, because that's the app that holds all your contacts -- the two apps are linked. When you're in Mail and you type in the name of a contact to send an email to, the app looks through People for the contact.
The People app holds other information about your contacts as well -- their addresses, phone numbers, website, and so on.
People is simple and straightforward to use. Here are some ways to get the most out of it:
Use contacts from multiple mail accounts
As with Mail and Calendar, you can use People to show all your information from several accounts in a single location. If you've already linked your accounts as described earlier in the article, you don't need to do anything to make this happen -- Windows does it automatically when you link the accounts in Mail or Calendar.
However, if you haven't linked the accounts in Mail or Calendar, you can do it within the People app:
- From the People app, choose Settings -> Add an Account.
- Follow the directions as outlined in the Mail app section of this article.
Filter your contacts
You can use the People app not just for emailing, but also for calling or texting people. If you use People for phoning or texting, you can filter the app's browse list so that only contacts with phone numbers will show up in it. First run the People app. Then:
- Select Settings -> Filter contact list.
- On the screen that appears, move the slider underneath Filter contacts to On. (When you do this, you'll still be able to find contacts without phone numbers when you do a search. Those contacts won't show up when you're browsing your listings, though.)
- Note that on this screen, you can also change which accounts show their contacts in People. Uncheck the boxes next to accounts whose contacts you don't want to show; check the boxes next to accounts whose contacts you do want to show.
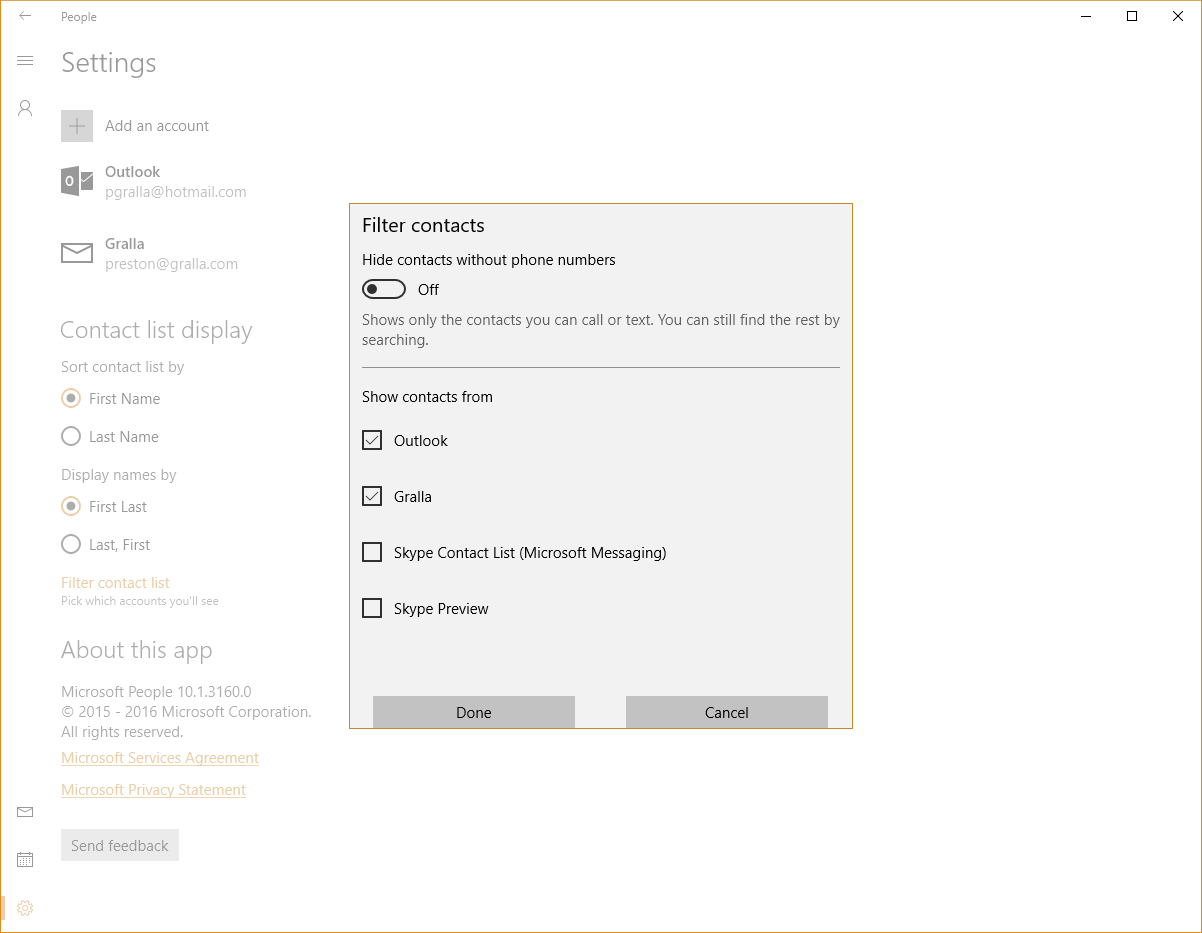 IDG
IDG You can filter your People list to, say, display only contacts with phone numbers.
Pay attention to the Timeline
One of the People app's more useful features is the Timeline that appears on the right side of any contact you click on. It shows a chronological list of all your communications with that person: emails, phone calls and texts. To see an email, click it, and the message opens in the Mail app. Phone calls and texts show up on the right side of the contact you click on, as do emails. Click them to see the full text or information about the call.
Link contacts
One problem with viewing contacts from multiple accounts in a single app is that you may have more than one copy of some contacts. You might have several listings for Jane Smith, for example, even though they're all for the same person. Each listing comes from a different account. This junks up your contact list.
There's a useful fix for that: You can link those copies. When you have a contact that is linked to others, all the information about the contact shows in a single combined listing, rather than in multiple ones.
- When you're viewing a contact, click the link icon at the top of the screen (it looks like a chain).
- You'll see a list of possibly duplicated contacts in the "Suggested links" area. Click the ones that you want linked to each other. Their names will then show up at the top of the same screen in the Linked profiles area.
- When you're done, click the checkmark at the top of the screen. This will create a single listing for the contact, with all the information included from each account.
If you have duplicates that don't show up in the Suggested links area, you can still link them:
- Click the "Choose a contact to link" button.
- Do a search from the screen that appears, and select the contacts you want to link.
One of the big benefits of linking contacts like this is that you'll be able to see all your communications with a particular contact on all your accounts on the Timeline. Without linking them, when you click a contact, you'll see only the communications that occurred using that specific mail account.
Finally, you can change your mind. Once you've linked a contact, a number will appear above that person's icon showing how many instances of that contact have been linked. If you want to unlink, click the link icon and then click the contact you want to unlink. From the screen that appears, click Unlink.
OneNote
OneNote is a solid note-taking app that many people overlook. The version that comes with Windows 10 (and which is also available as a free download) is similar to the more feature-filled application that ships with Microsoft Office. The latter includes better text-formatting features, spell-check, superior customizability and better organizational tools. But the Windows 10 version is simpler to use, has a more straightforward interface -- and, in fact, should suit most people's needs. (You can, if you want, use both without any problems, since they automatically sync via the cloud.)
 IDG
IDG The OneNote app is a surprisingly useful note-taking tool.
Using the app is simple and intuitive, so you won't need any advice for creating notes, formatting text, or inserting links and pictures (including pictures you take with your device's camera). But there's more you can do:
Search through your notes
Your OneNote notes are organized in a long scrollable list on the left-hand side of the screen, which doesn't make it easy to quickly find the exact information you need -- for example, those budget projections for next year that you put in a note five months ago. Unfortunately, the search box isn't easy to find:
- Click the hamburger menu at the top left of the screen.
- You can now see the search box. Type in your search term and you'll see a list of the notes that contain the term.
- Click on any item in the list to jump to that note.
Customize your syncing
You can control whether the Windows 10 app version of OneNote syncs with the cloud, and from there to versions of OneNote installed on other devices:
- Click the hamburger menu, scroll to the bottom and click Settings.
- From the screen that appears, choose Options.
- To sync with the cloud, go to the "Sync notebooks automatically" setting and move the slider to On. If you don't want to sync, move the slider to Off.
Capture pages from the web
Sometimes you'll come across web pages you'd like to save. The free OneNote Web Clipper browser add-on makes it easy to save them. It works with a variety of browsers, including Chrome, Edge, Firefox, Internet Explorer and Safari.
One you've installed the Web Clipper, when you're on a web page you want to capture, click the OneNote icon in your browser. It will let you choose whether to capture the entire page, a section of the page, or what Web Clipper calls an article, meaning the page's content without ads or multimedia content.
Other apps worth checking out
A few other special-purpose built-in Windows apps are worth using:
Voice recorder
This app does what its name indicates: It records your voice or any other sounds using your device's microphone. Simply click the record button to start recording, then click it again to stop.
Windows Ink
If you've got a touch-screen device and a stylus, check out this note-taking and annotation app. (It's available only with the Windows 10 Anniversary Update.)
It's got three components: Sticky Notes, for writing notes and keeping them on your desktop; Sketchpad for making freehand drawings; and Screen Sketch, which takes a screenshot of your current screen, then lets you draw on and annotate it.
3D Builder
Got a 3D printer? Then try out 3D Builder, which lets you create three-dimensional objects for printing. In addition to letting you create them from scratch, it comes with pre-built objects such as rockets, trains, trophies and more.