
You’ve probably spent a lot of time through the years gathering productivity tips for your favorite applications — after all, that’s where you get most of your work done. If you’re like most people, though, you’ve managed to find your way around Windows 11 but figured there’s not much you can do to improve your productivity in the OS itself.
We beg to differ. There’s a lot you can do to make your work more productive with Windows 11 — it’s just that most of it is hidden. We’ve delved deep into the operating system and come up with these useful productivity tips.
1. Get focused with focus sessions
The biggest productivity-sapper for office workers is one that has been drastically worsened by technology: Many of us are unable to focus on one task at a time, constantly bedeviled by the distractions that are always at hand when you work on a computer. If you find yourself unable to focus on a single task on your PC, join the club. We’re all prone to it.
Windows 11’s Focus sessions feature can help. It enables Windows 11’s Do Not Disturb mode, which turns off all Windows notifications. In addition, apps in the taskbar won’t flash at you if they require a response. Badge notifications on apps in the taskbar are turned off as well.
A focus session uses Windows Clock to let you set a time limit for the session. That way, you won’t be distracted by worrying about how long you want the do-not-disturb session to last. And if background music helps you work, you can also have Spotify play music you specify for the length of the session.
To use Focus sessions:
- Run the Windows 11 Clock app. The simplest way is to type clock in the Search box and then click the Clock app that appears.
- Click Focus sessions. If it’s the first time you’re using it, click the Get started
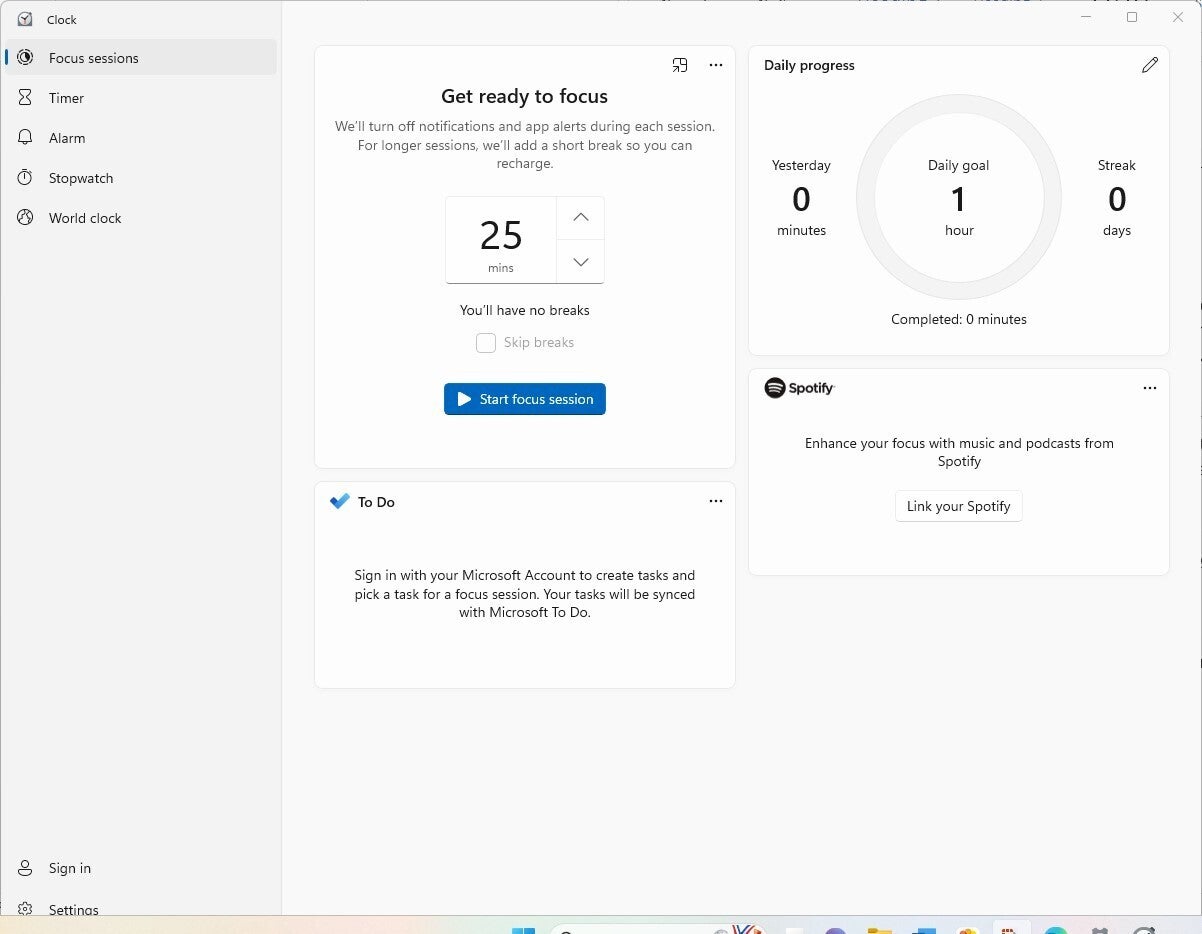
- The Focus session page appears. In the “Get ready to focus” area, select how long you want the session to last. If you choose less than 30 minutes, the session won’t have a break. If you choose 30 minutes or longer, you’ll be given short breaks. If you don’t want breaks, click the Skip breaks box.
 IDG
IDG
Here’s command central for setting up a focus session. (Click image to enlarge it.)
- If you want to use Microsoft To Do and choose tasks from your To Do list, make sure you’re signed into your Microsoft account, right-click the three-dot menu in the To Do area, and click Open in To Do. You’ll be connected to your To Do list.
- If you want to play music, click Link your Spotify and follow the instructions for linking to your Spotify account and playing music.
When you’re done, click Start focus session and get to work. If you want to set a daily goal for how long to use focus sessions, right-click the three-dot menu in the “Daily progress” area. From now on, whenever you start a Focus session, you’ll see how often you’ve met your daily goal.
2. Type with your voice
How fast a typist are you? No matter how fast you are, it’s unlikely you can type at the speed of thought — or at the speed of speech. And the faster you type, the more mistakes you’re going to make.
A great way to get more productive at the keyboard is to have your computer do your typing for you by using Windows 11’s voice typing feature. Hold down the Windows key + H to summon Windows’ built-in voice typist. Click the microphone icon that appears and start talking. Note that the first time you use it, Windows will install speech-recognition software to improve its performance.
You’ll be surprised at how fast and accurate it is if you speak in a clear voice. However, there are a few things to keep in mind when using it. One is that there’s sometimes a lag between your speech and when your words are typed in. So if you don’t see the words instantly onscreen, don’t repeat yourself — if you do, your words will be typed twice.
Also, if you try to make edits to the text during the session, by doing things such as deleting text or inserting paragraphs, the session will automatically end. You’ll have to turn voice typing back on.
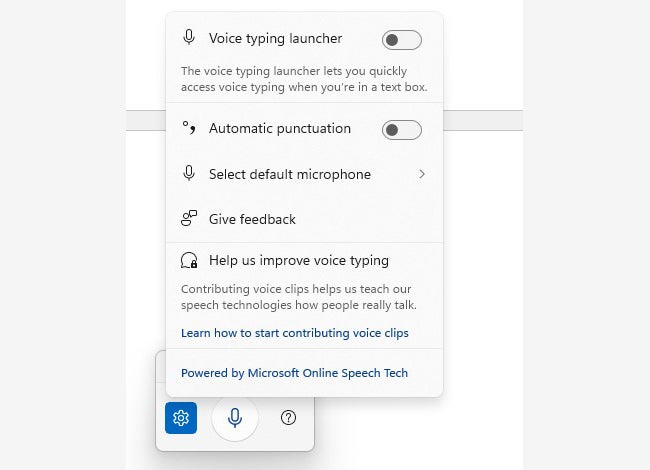
It also won’t automatically use punctuation. It won’t put a period at the end of a sentence, or commas in the middle of sentences. There’s a way to have it type punctuation, however. Click the settings icon to the left of the microphone and move the slider to on in the “Automatic punctuation” section. You can then say “period” to voice-type a period; “comma” to voice type a comma, and so on.
If you want to use voice typing in text boxes within Windows (such as inside a dialog box), move the slider to on next to “Voice typing launcher.”
 IDG
IDG
Here’s how to customise how Windows 11 speech recognition works.
3. Use Teams via the taskbar
Microsoft claims that as of March 2023, its collaboration software Teams had more than 300 million monthly active users around the world. If you’re one of those people, Windows 11 has a quick-and-easy productivity booster: click the Teams icon on the taskbar (it looks like a video camera) to launch it. You can also use the keyboard shortcut Windows key + C.
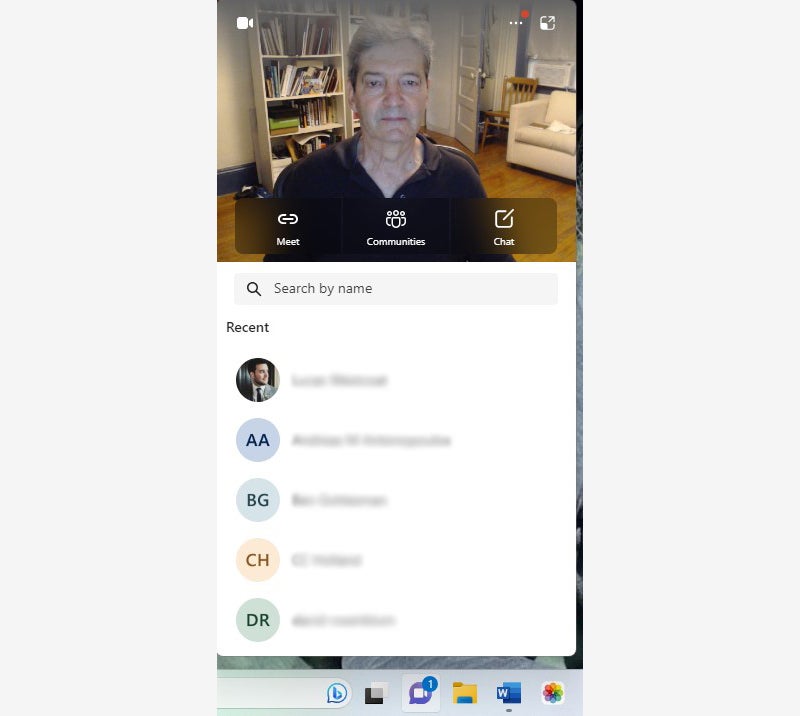
When you launch Teams that way, you’ll see a window showing your most recent Teams activity. Click Meet to start a video call, or click Chat to begin a text conversation. To launch the full-blown Teams app instead of this stripped-down version, click Open Microsoft Teams.
 IDG
IDG
You can launch Teams directly from the Windows 11 taskbar.
4. Copy and paste like a pro
For decades, the Windows Clipboard had been brain-dead. You copied something into it, pasted that clip into an application, and that was that. The next time you copied a clip into it, the old one disappeared.
Not these days, though. Microsoft has smartened it up. Now it stores multiple clips and lets you preview those clips and choose which one you’d like to paste into a document. You can also store clips permanently, a great way to keep boilerplate text around that you can paste into documents or emails, or store a graphic of your signature to help digitally sign documents.
You can even sync your Clipboard history across multiple Windows devices: Go to Settings System Clipboard. In the “Clipboard history” section, make sure the slider is on. In the “Sync across devices” section, turn the slider from off to on.
Copy items to the Clipboard in all the myriad ways you’re used to, such as pressing Ctrl + C, right-clicking an image on the web and selecting Copy image from the menu that appears, and so on. You can keep on copying items, and the Clipboard will keep saving them as individual clips. There’s no hard limit on the number of clips you can save — it’s based on how much memory you have and the amount of total data in all your saved clips. However, there is a maximum size of 4MB for each individual clip.
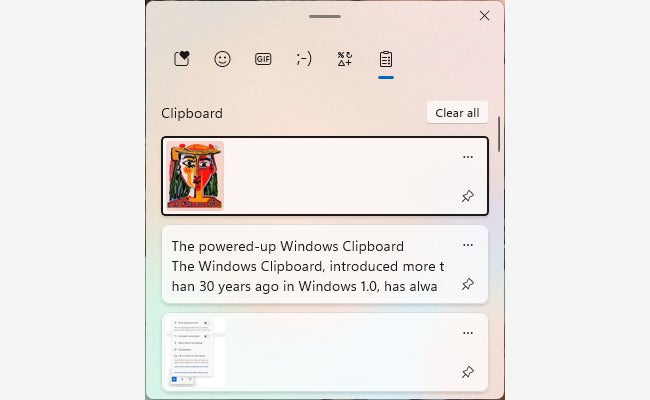
After you’ve copied clips into the Clipboard, you can scroll through them, preview them, and choose which to paste into a document. To see them, press Windows key + V. A small window appears with the clips you’ve pasted to the Clipboard. Scroll through, and when you find the clip you want to paste, click it. If you only want to paste your most recent clip into a document, just press Ctrl + V.
 IDG
IDG
The powered-up Windows Clipboard.
If you’ve chosen to sync the clips, they’ll be available on the Clipboard of all other Windows 11 or 10 devices you choose to sync.
The Clipboard has a few other tricks up its sleeve, with icons across its top for pasting emoji, kaomoji, popular GIFs from the internet, and symbols.
Your clips are deleted when you turn off your PC. But you can save some permanently. Press Windows key + V to launch the Clipboard, click the three-dot icon at the top right of any clip, and select Pin. That pins the clip to the Clipboard permanently until you unpin it.
You can also manually clean out your Clipboard by deleting individual clips or by deleting them all at once. To delete an individual clip, click the three-dot icon at its top right and select Delete. To delete all the clips in the Clipboard, click the three-dot icon at the top right of any clip and select Clear all. Pinned clips won’t be deleted unless you delete them individually.
5. Power up Windows 11 with PowerToys
Longtime Windows tinkerers and productivity-seekers will likely remember Windows PowerToys, first released for Windows 95 several years before the turn of the century. PowerToys were small, free utilities from Microsoft that let you tweak, customise, and power up Windows in countless ways. Used incorrectly, they could waste many non-productive but pleasant hours tinkering away. Used correctly, they could be a great Windows productivity booster, mainly for small tasks that can take up large chunks of your time.
After updating PowerToys for Windows XP, Microsoft unaccountably abandoned them in Windows Vista, Windows 7, and Windows 8/8.1. It wasn’t until September 2019, four years after the release of Windows 10, that they were updated for Windows 10, and then for Windows 11 when it was released.
These days it’s hard to know whether to refer to PowerToys as singular or plural; in its current incarnation, PowerToys is a single app that contains many handy mini tools. The PowerToys app doesn’t come installed in Windows 11; you instead download it for free. As I write this, PowerToys includes nearly two dozen tools, and Microsoft regularly adds new ones.
 IDG
IDG
Microsoft’s free PowerToys app offers nearly two dozen productivity boosters, including one for doing bulk resizing of images. (Click image to enlarge it.)
There isn’t room in this article to delve into every tool, but it’s worth trying several out to see if they’re useful for you. Here are my favorite five:
- Image Resizer: Need to resize multiple photos or images in the same way in one fell swoop? With this utility, just select the images, choose how you want them resized, and click.
- Always on Top: Are you driven crazy when you’re using a productivity app like Word and Excel, you temporarily move your focus to another window, and the app gets hidden? No more. Always on Top keeps your productivity app in front, even when you switch focus.
- Keyboard Manager: Keyboard shortcuts are among the greatest productivity boosters for getting things done quickly. If there’s not enough of them for you in Windows 11, this tool lets you remap your keyboard and create keyboard shortcuts.
- Paste as Plain Text: Hate it when you copy text from the internet, an app, or somewhere else and it carries all its formatting with it? This tool lets you instantly remove formatting so you can paste it as plain text.
- Mouse Utilities: Master your mouse with these utilities — you’ll be able to do things like shake your mouse to focus its pointer, draw crosshairs centered around the pointer, make the pointer jump to anywhere on your screen, and more.
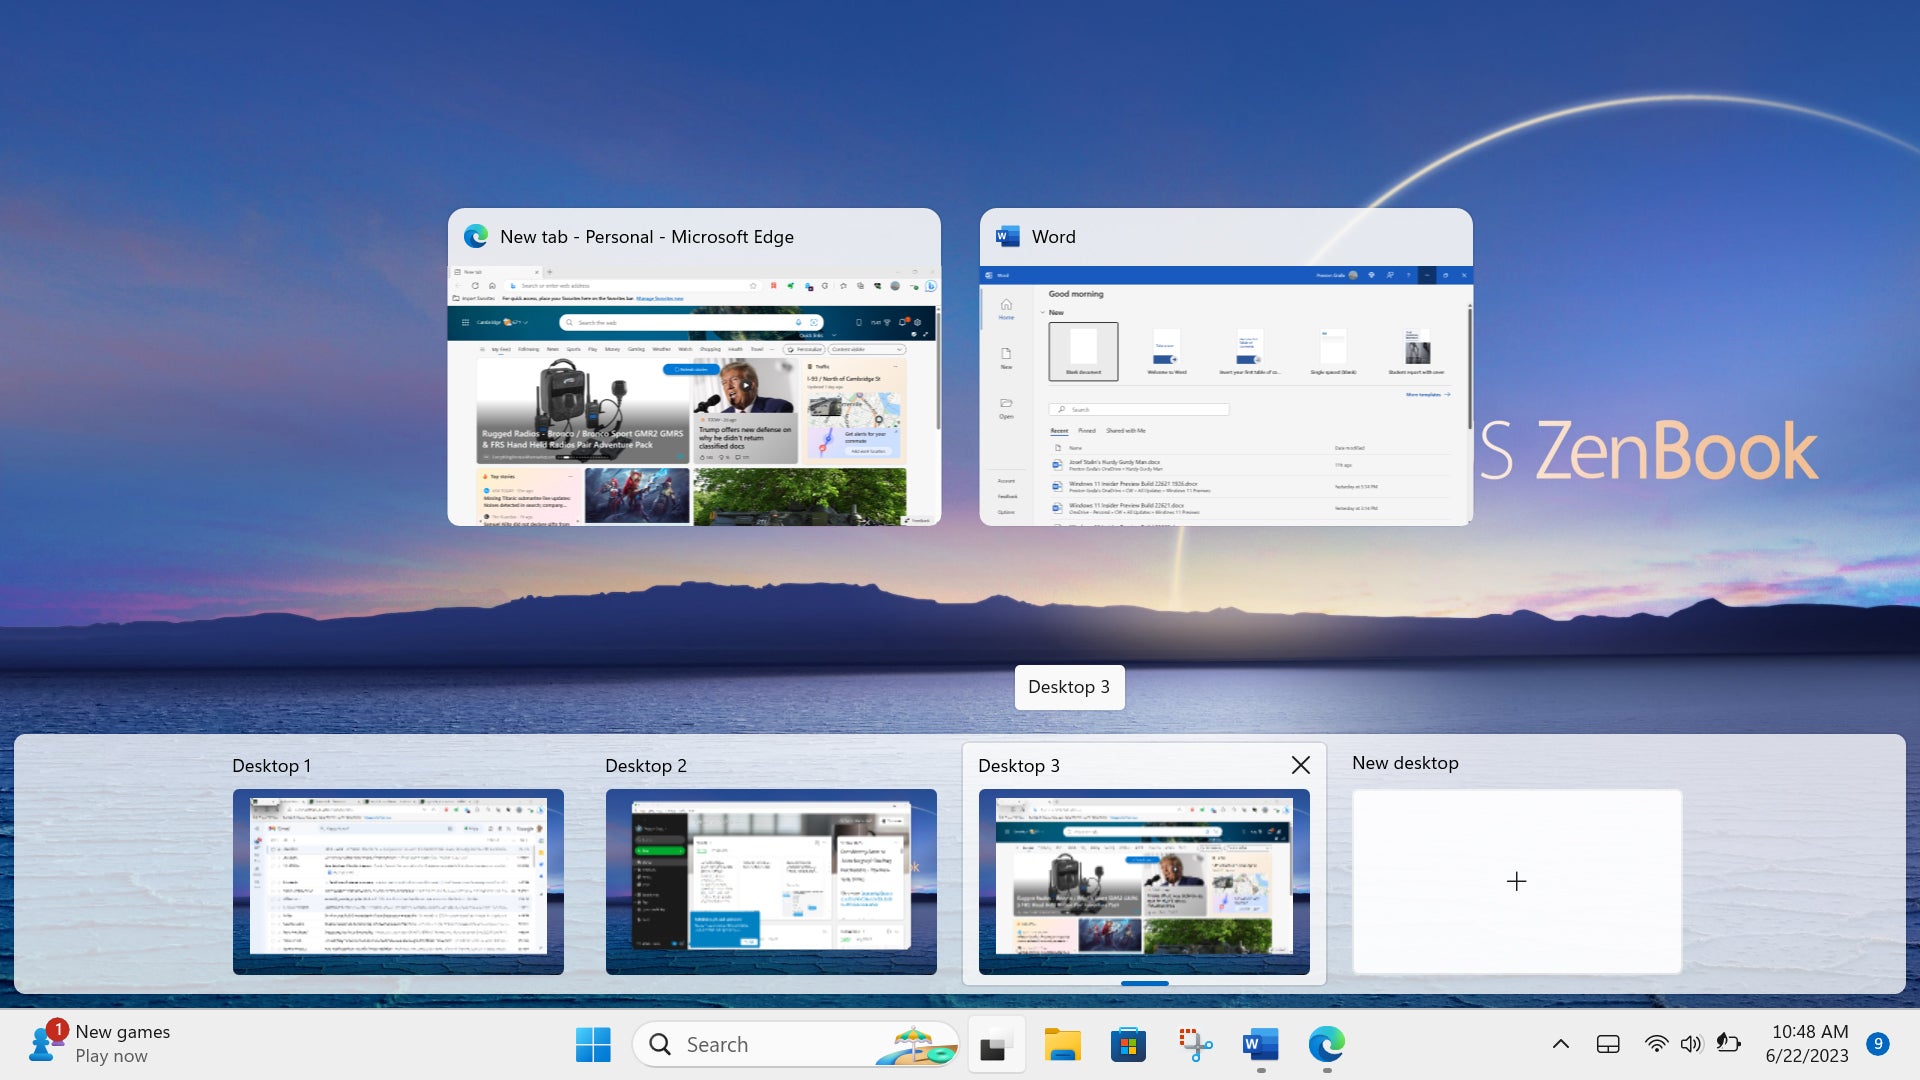
6. Create virtual desktops
You generally use your PC for many different purposes. You might, for example, use one set of apps for creating presentations, another for making videos, and another when researching and writing. Or you may have a set of apps you typically use when working at the office and a somewhat different set when working remotely. And, let’s face it, occasionally you might even want to do something non-work-related on your PC. So you may waste time hunting for the right apps for each situation.
Virtual desktops make it easier to use your PC for different purposes. You can create multiple desktops with different apps running on each one for different reasons, such as one for working at home, one for working at the office, another for gaming, etc.
 IDG
IDG
Creating virtual desktops in Windows 11. (Click image to enlarge it.)
It’s simple to do. Click the overlapping windows icon to the right of the search box on the taskbar. If you haven’t created any virtual desktops yet, the top part of your screen will show all the open windows on your desktop, and the bottom of the screen will display “Desktop 1” (which is your existing desktop) and “New Desktop” with a + sign under it. To create a new desktop, click the + sign. A new desktop appears, titled “Desktop 2.” Click it to make it your desktop, and set it up however you want.
You can keep making new desktops this way. To switch between them, click the overlapping windows icon and select the one you want to use. You can set up each desktop any way you want — for example, by putting all the icons for in-office related apps within easy reach in one, and all the icons for working at home in another.
To make it easier to differentiate between them, you can rename each desktop. Simply click its name (Desktop 1, for example) and type in the new name you want.
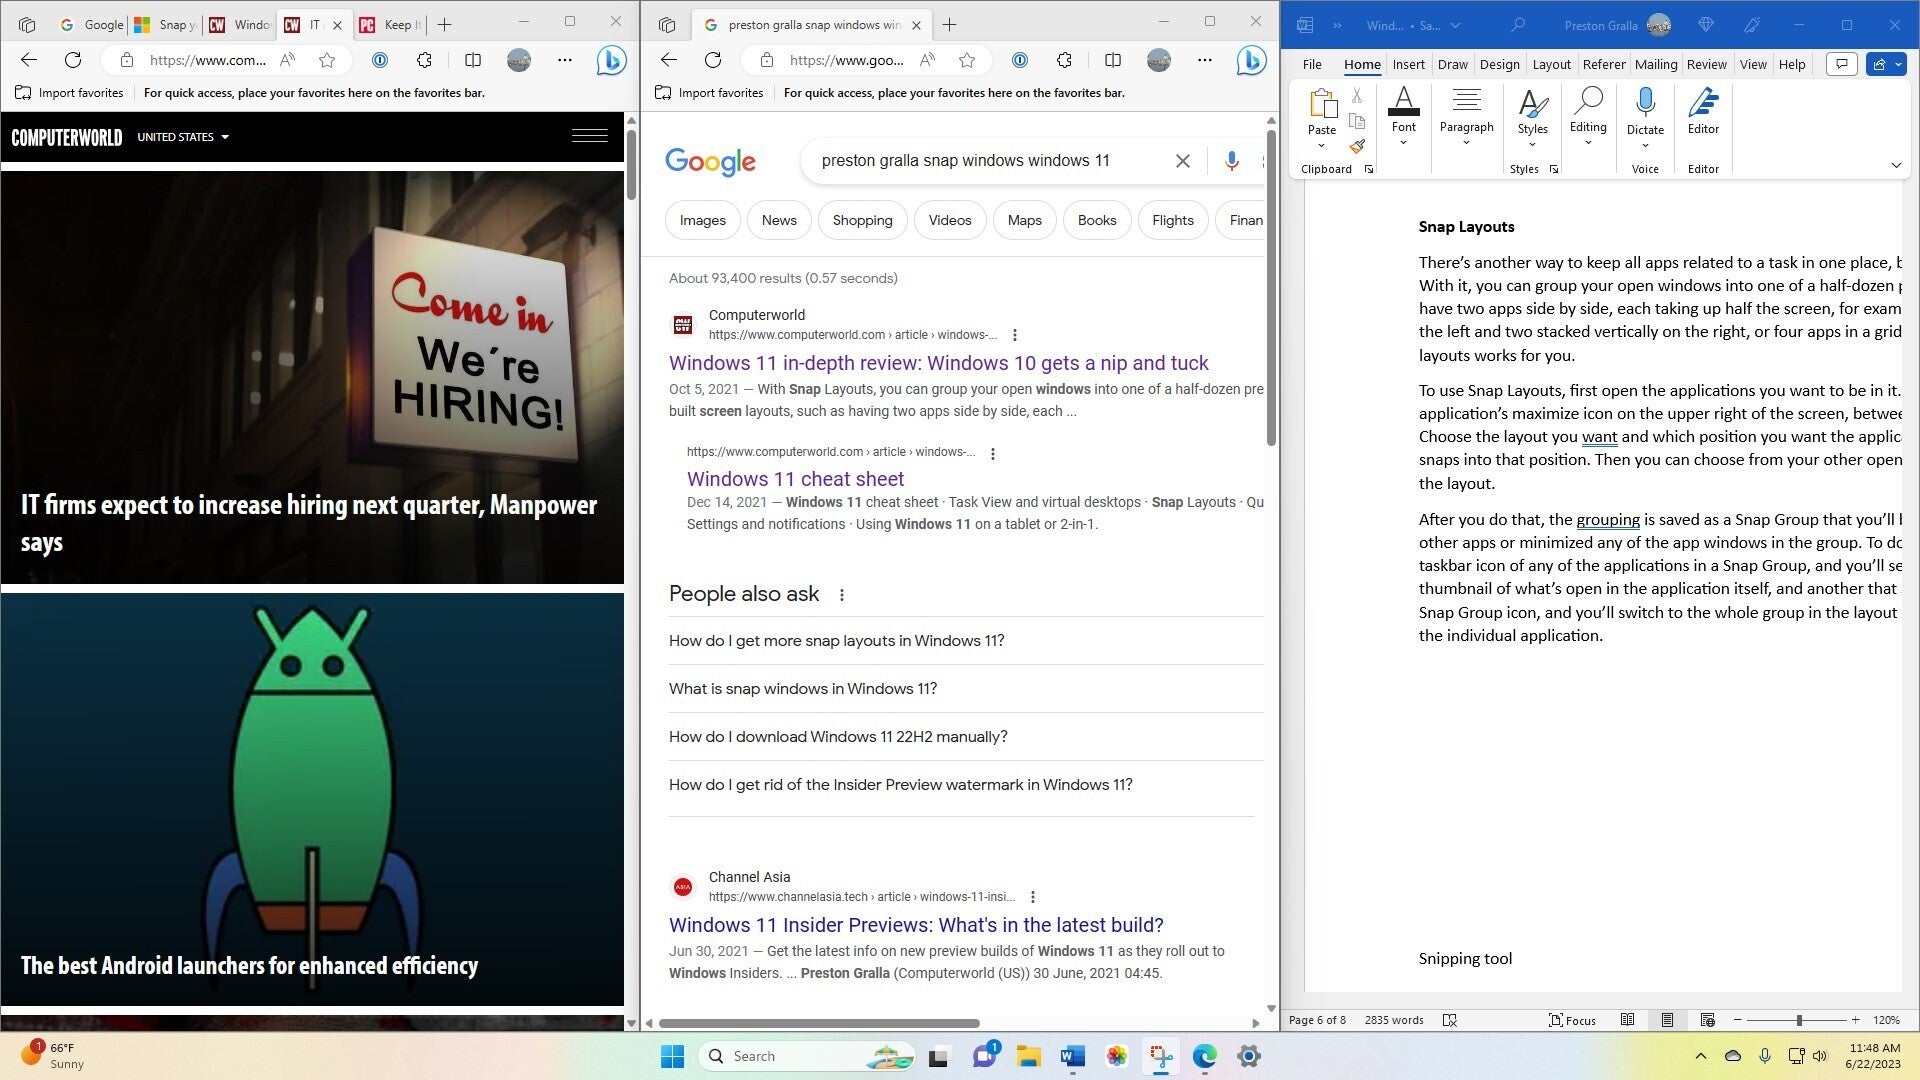
7. Organise your apps with Snap Layouts
There’s another way to keep all apps related to a task in one place — by using Windows 11’s Snap Layouts feature. With it, you can group your open windows into one of a half-dozen pre-built screen layouts. You can have two apps side by side, each taking up half the screen, for example. Or you might have one app on the left and two stacked vertically on the right, or four apps in a grid.
 IDG
IDG
Snap Layouts in action. (Click image to enlarge it.)
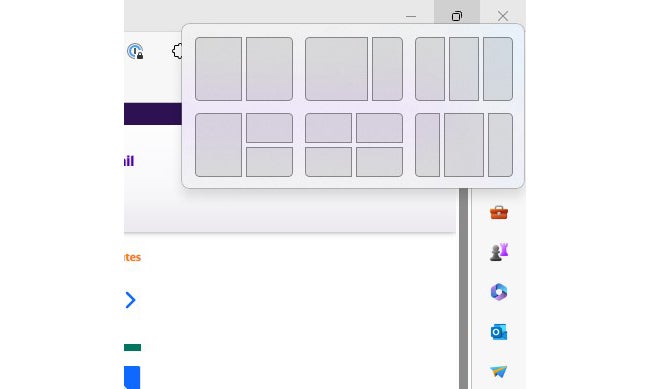
To use Snap Layouts, first open the applications you want to be in a layout. Then hover your mouse over an application’s maximise icon on the upper right of the window, between the minimise and close icons. A panel appears with layout options. Choose the layout you want and which position you want the application to be in, and the app window snaps into that position.
 IDG
IDG
Choosing a layout.
When you do that, all your other open apps will display inside a new window. Click any of those apps to fill in spots in the rest of the layout. The grouping is saved as a Snap Group that you can to return to if you’ve opened other apps or minimised any of the group’s app windows. To return to the group, hover your mouse over the taskbar icon of any of the applications in a Snap Group. You’ll see thumbnails of all the apps in the group. Click the thumbnail to return to the group.
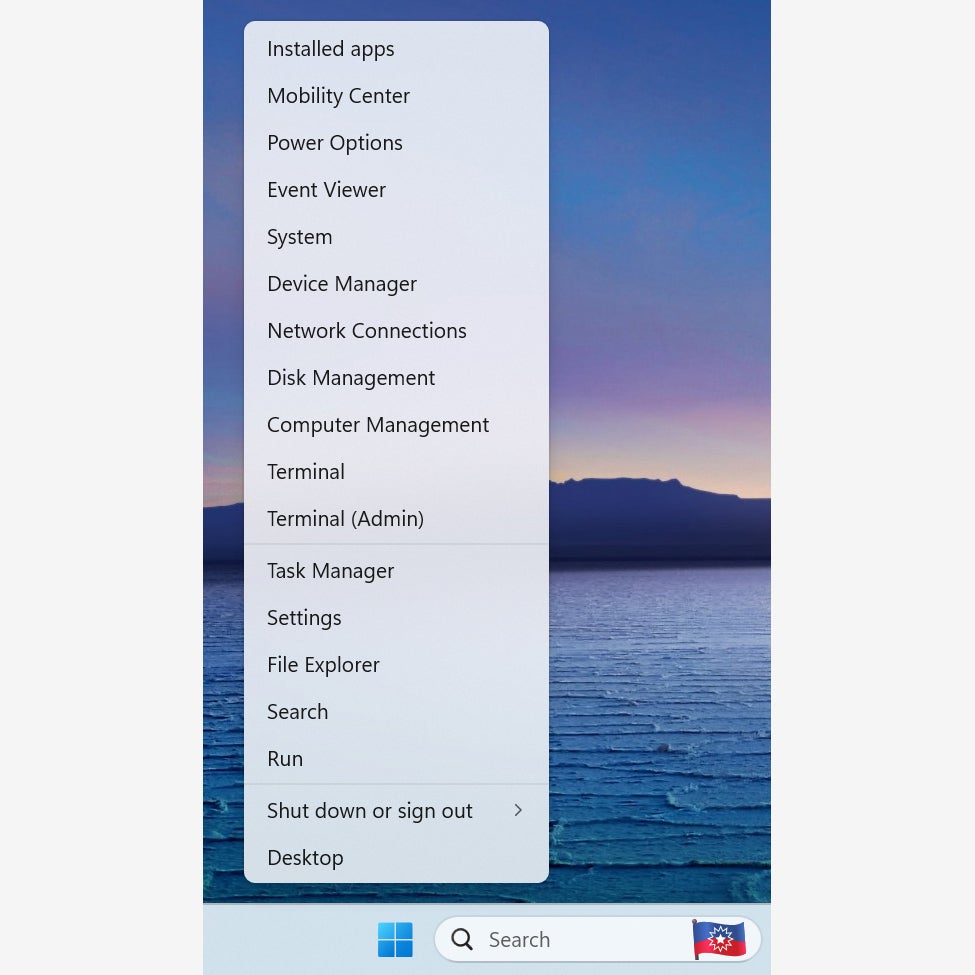
8. Use the secret Start menu
Hidden in the bowels of Windows 11 are many powerful tools that can make you more productive, such as Network Connections for viewing and managing your internet connections; Device Manager for managing your devices; Terminal (also called Windows PowerShell), with extremely powerful command-line tools, especially for IT pros; Task Manager for helping make your PC more efficient; and many others.
That’s all well and good, but unless you use them all the time, it’s easy to forget that they exist. And even if you do remember they exist, it’s often not easy to find them. Some are buried deep in the Settings app. Others require that you launch them from a command line. And yet others may be squirrelled away in a place you’ll never find.
There’s a trick for getting to them — use what some people call the secret Start menu. To launch it, right-click the Windows icon to the left of the search box, or press the Windows key + X. A menu appears with an entire list of these tools. Click whatever tool you want to use and get going with it.
 IDG
IDG
Here’s what some people call the “secret Start menu” for getting quick access to productivity-boosters. (Click image to enlarge it.)
Bonus tip: Check for the Windows Copilot launch
Microsoft has been building generative AI capabilities into its entire product line, and that includes Windows itself, with a feature called Windows Copilot. As of this writing, it hasn’t been launched to the general public, but here’s how Microsoft described Windows Copilot in a blog post announcing the assistant:
“It makes every user a power user, helping you take action, customise your settings and seamlessly connect across your favorite apps... For example, you can not only copy and paste, but also ask Windows Copilot to rewrite, summarise or explain your content.”
Microsoft recently made an early preview version of Windows Copilot available to some members of its Windows Insider program. However, the company made it clear that this preview focused only on the Copilot user interface, available via a right pane on the screen, and not on the features Copilot will eventually have.
It could turn out to be a great productivity booster… or not. Check back here for more details when it launches.
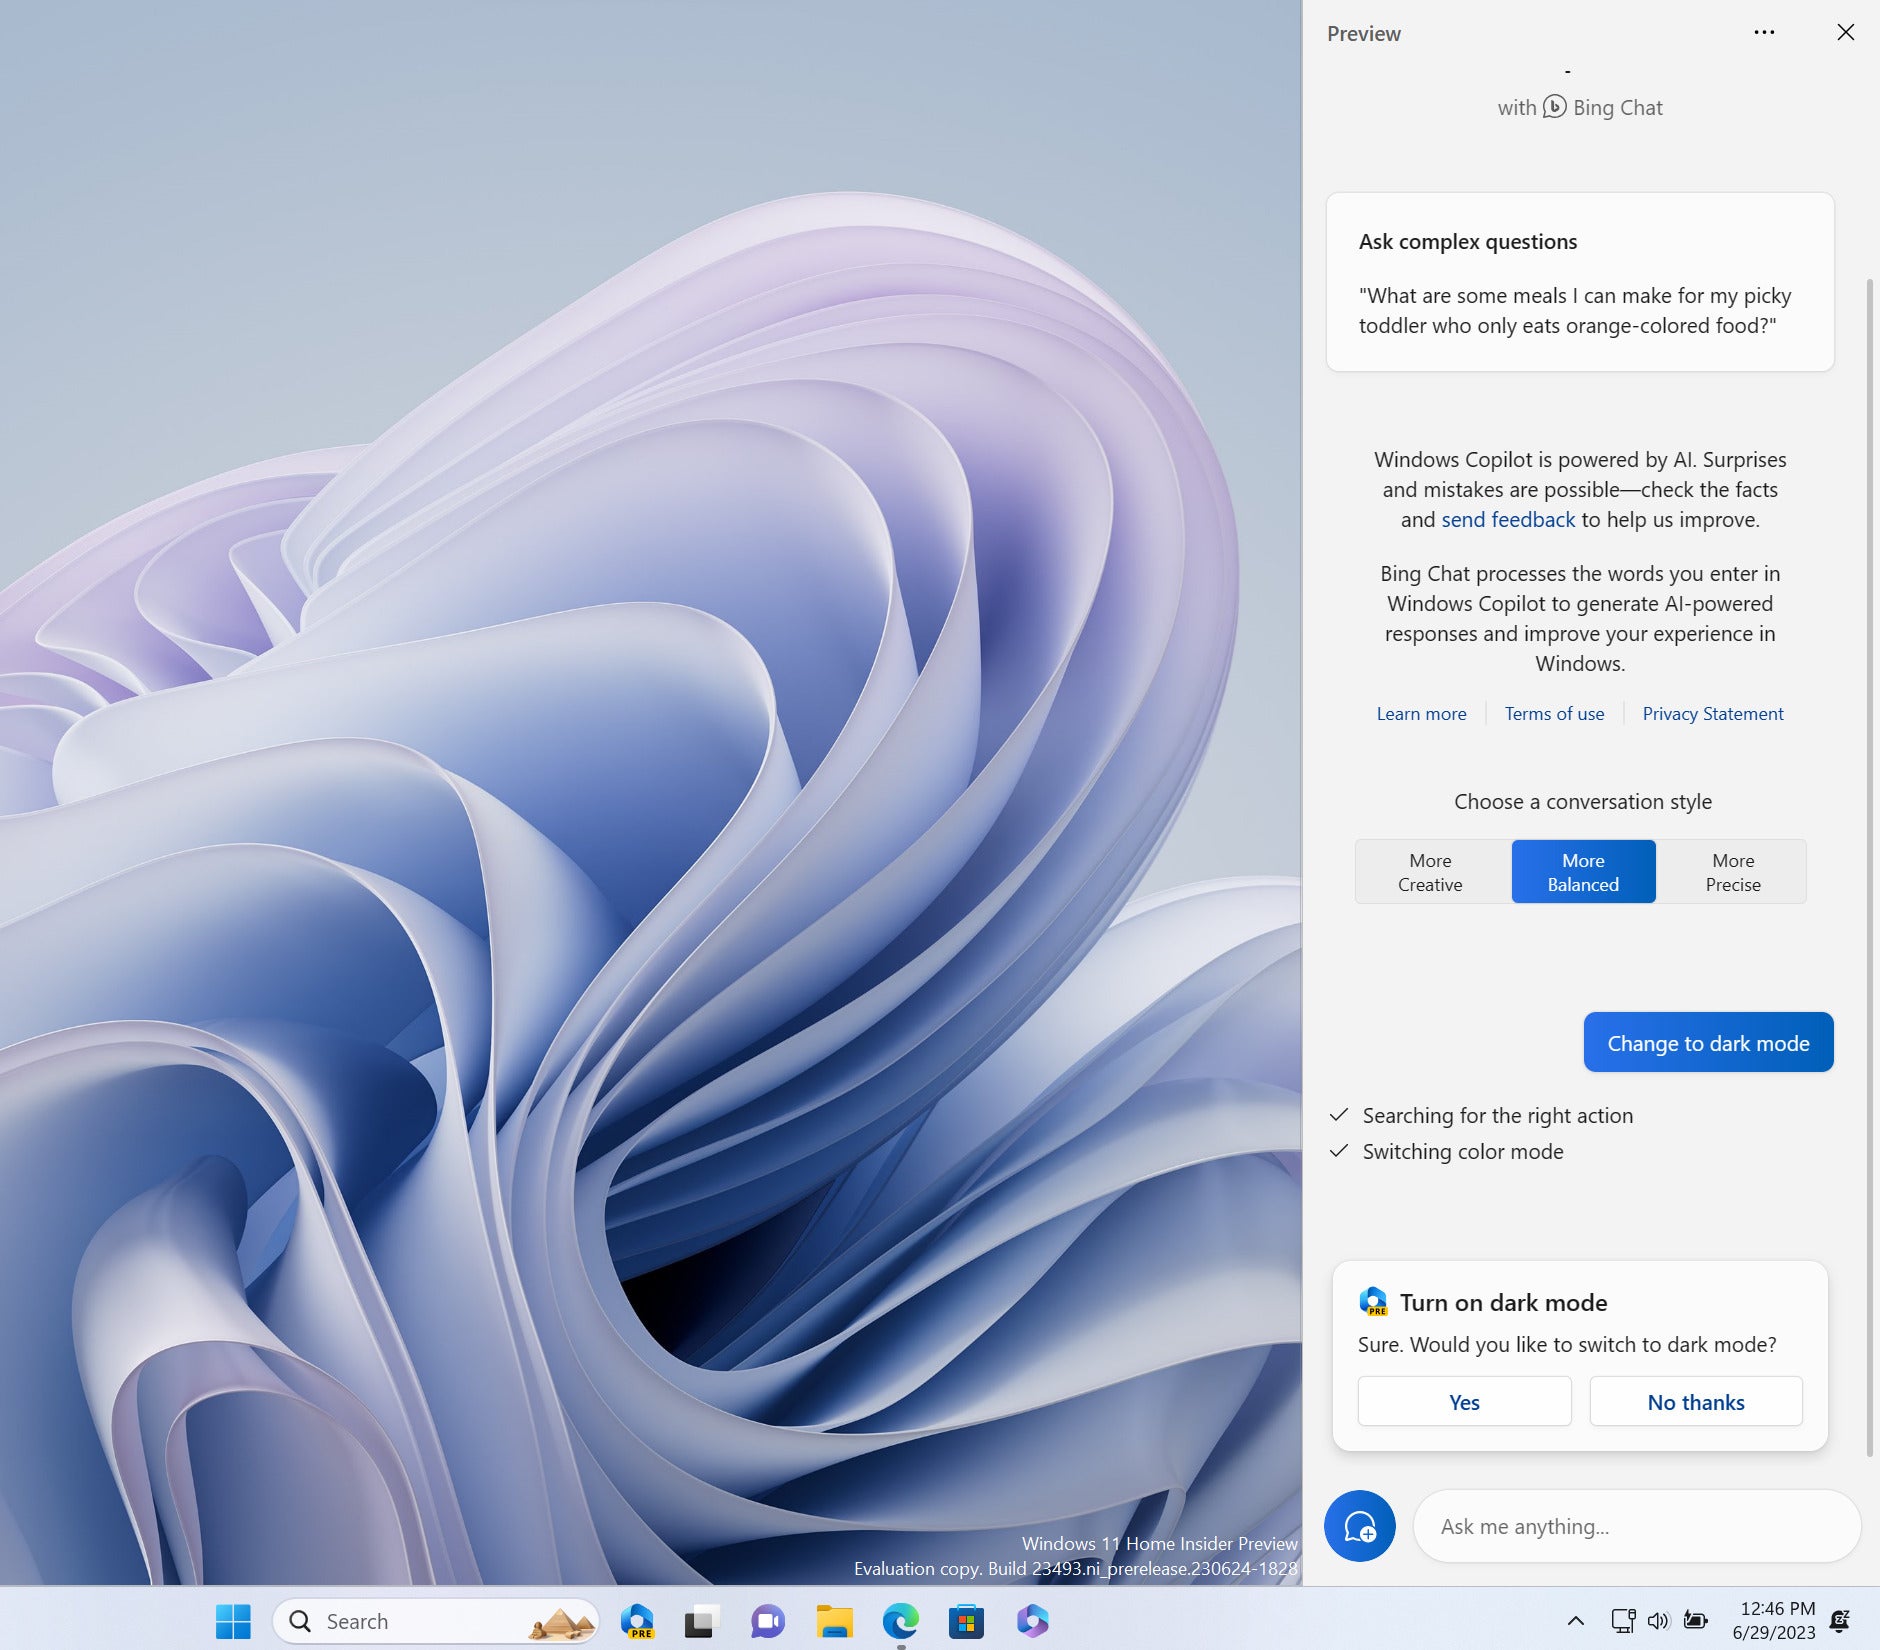 Mark Hachman / IDG
A preview version of Windows Copilot. (Click image to enlarge it.)


